We’ve got you covered this holiday season with some fun DIY Christmas gift ideas! People have spent more time at home being creative this year than ever before. From bread making to starting new gardens to DIY Halloween decorations! We’re excited to keep the homemade craft ideas going this season with stocking stuffer ideas and DIY Christmas presents for you to make!
We’ll show you the steps to make a beautiful etched cutting board, coasters that can fit in a stocking, memory blocks that would work great for a gift for mom or dad, a grill set holder to hang outside, and of course, Christmas tree sugar cookies!
We hope you enjoy these creative DIY Christmas gift ideas. Have fun!
DIY Unique Christmas Presents
Homemade Christmas gifts are the perfect way to show someone how much you care! Try this unique DIY idea that would be perfect for anyone in the family: Etched Cutting Boards.
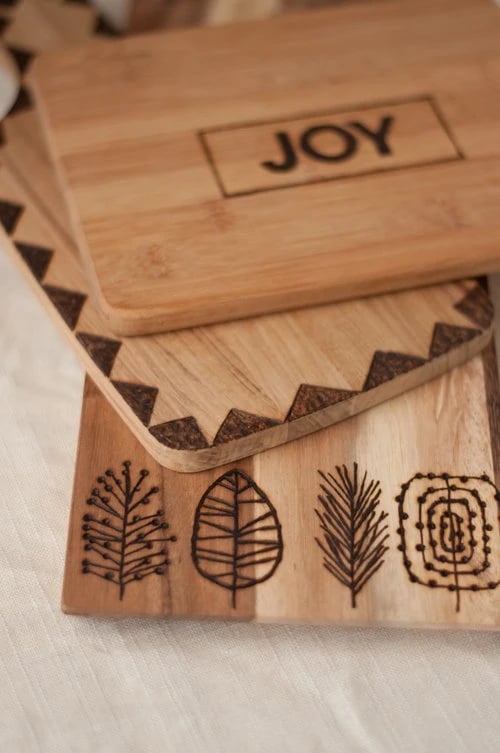
Supplies to make your own etched cutting board:
- Dremel etching tool
- Cutting boards (any size or shape!)
- Inspiration designs
Steps:
- Follow the directions for the Dremel and choose the appropriate attachment for your design.
- To add a word or phrase to your cutting board, you can type it up and print it out. You can use transfer paper
- to transfer the lettering onto the cutting board or rub a pencil on the backside.
- You can freehand different designs that you like as well! The opportunities are endless!
Christmas Cookies
We found the easiest Christmas cookies to bake! Delicious cut-out cookies with no chill time required. The whole family will love these Christmas tree sugar cookies!
The base for the cookie is a round sugar cookie cut with a 3” biscuit cutter (at Owenhouse Ace, we have a variety of shapes and sizes of cookie cutters for you to choose from, if you’d like to be creative!) This recipe calls for royal icing because it’s super smooth and dries flat. Its matte finish will be the perfect backdrop to your designs!
 Ingredients:
For the sugar cookie cut-outs:
- 1 1/2 cups flour, plus extra for rolling
- 1 teaspoon baking powder
- pinch of salt
- 1/2 cup unsalted butter, softened
- 1/2 cup granulated sugar
- 2 large egg yolks (save the whites for the frosting)
- 1 teaspoon vanilla extract
For decorating:
- 2 cups powdered sugar
- 1 tablespoon freshly squeezed lemon juice
- 2 large egg whites
- 1 tube green frosting with a small tip
- red and green sprinkles
- star sprinkles
Steps:
- In a small bowl, whisk together the flour, baking powder and salt.
- In a medium bowl, beat together with an electric mixer the butter and sugar. Once light and fluffy, add the egg yolk and vanilla extract.
- Once well incorporated, sprinkle over half the flour mixture and beat gently until combined, then sprinkle over the rest. Beat until no streaks of flour remain, but be careful not to over-mix.
- Dust a clean countertop with flour, and dump half of the dough out onto it. Gather it into a ball and press it into a 1/2″ thick round disk. Flour your rolling pin, then roll out the dough out big enough to cut out about 8-9 shapes. Place the shapes on a baking sheet lined with parchment paper or a silicone mat. Gather the dough scraps and re-roll to cut out 8-9 more shapes and place them on the cookie sheet. You should get roughly 16 cookies.
- Place the cookie sheet in the freezer for minutes while you preheat the oven to 350.
- Once the oven is hot, bake the cookies for 10-12 minutes, until the edges of the cookies just start to turn brown. Let them sit on the sheet for a few minutes before moving them to a wire rack to cool completely.
- Once the cookies are cooled completely, make the royal icing: In a small bowl, combine the powdered sugar and lemon juice.
- Beat the egg white in a small bowl to loosen them, and then measure out 2 tablespoons of egg whites and add them to the bowl with the sugar.
- Whisk together the icing, starting slowly, and trust that the sugar will melt and it will become liquid. Resist the urge to add any more liquid to the bowl and instead, just keep whisk slowly.
- When the icing comes together, spoon a small amount onto each cookie, and use an off-set spatula to spread it almost to the edges.
- Let the royal icing harden completely on the cookies before proceeding.
- Using the green frosting tube, make a zig-zag Christmas tree shape in the center of a cookie. Immediately add the nonpareil sprinkles and press a star candy on top. Because the royal icing is already dry, the sprinkles will only stick to the Christmas tree shape. Repeat with all remaining cookies.
Best DIY Stocking Stuffer Ideas
DIY Numbered Wood Slice Coasters make another great DIY Christmas gift idea! You could design these coasters in a variety of ways but we love the number design. What a great way for people to not lose their mug! This easy DIY Christmas gift will fit snugly in a stocking.
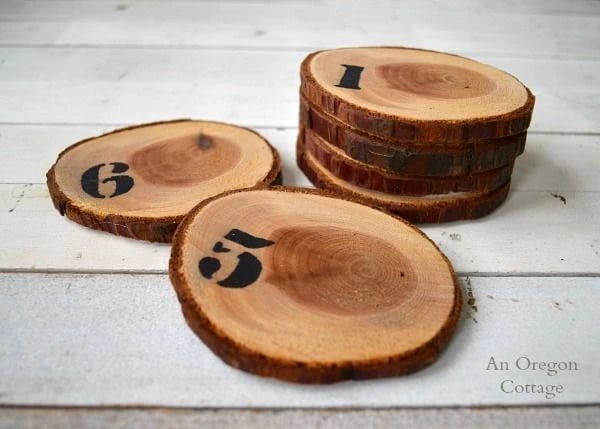 Supplies:
- ¼ to ½” wood slices cut from tree branches about 4” round
- 1” number stencils
- Pencil
- Black permanent Sharpie marker
- Sanding block
- Clear spray topcoat
- Felt
- Glue gun
Steps:
- If you’ve cut your own wood slices, be sure to let them dry for a week at a warm temperature.
- Sand the edges and tops of your wood slices using a sanding block.
- Outline the number stencils using a pencil on the wood slice.
- Fill in the pencil outline using a Sharpie.
- Brush on a poly topcoat or use a clear spray topcoat to protect your coasters.
- Add felt to the bottom of your slices with a hot glue gun to protect table surfaces.
DIY Christmas Gifts for Moms or Wives
 Warning, this one might make mom cry! Happy tears of course! These sentimental memory blocks make the perfect DIY Christmas gift for Mom.
Supplies:
- 4-inch wood block
- Craft paint
- Sanding block
- Mod Podge
- Foam Paint Brush
- 6 photos printed on regular paper (4 x 4 inches in size)
- Clear acrylic coating spray
Steps:
- Paint all sides of your wood block with craft paint. Make sure you allow plenty of time to let it dry!
- Rub sandpaper over the block until your desired look is achieved.
- Cut out your images so they are just a tad smaller than 4 x 4 inches.
- Apply Mod Podge with a foam paintbrush to the backside of each photo and press onto the wood block covering all 6 sides. Allow 3-4 hours to dry.
- Paint one smooth coat of Mod Podge over all six images. 2-3 hours dry time.
- Spray acrylic coating spray over each side of the photo wood block. Again, allow plenty of time to dry.
DIY Christmas Gifts for Dads or Husbands

It always seems that Dads are the hardest to buy presents for, so why not make something! We found a lot of DIY Christmas gifts for dad but the Grill Set Holder was our favorite! At Owenhouse Ace Hardware, we love to grill!
Supplies:
- Wood (fence panels work great!)
- Paint (Spray Paint)
- Aging Solution (steel wool, jar, white vinegar)
- Paint brush
- 3/4″ Screws
- Knobs
- Vinyl
- Spray Polyurethane
- Grill Set
Steps:
- Cut the 4 wood panels to 4” in width and 31.5″ in length.
- Cut two pieces that are 2” x 15”
- Cut one of the strapping pieces on the long edge at an angle to create an undercut.
- Making sure the boards are square to each other and lined up, place the strapping across all 4 boards near the top and the bottom of the back of the sign. Drill at least 1 screw into each board.
- Make the aging solution: tear pieces of steel wool and place them in a jar. Fill the jar with distilled white vinegar. Close and let sit for at least 12 hours. Shake before using.
- Paint using the paintbrush. The wood will begin to gray after a minute or so.
Let dry. - Design your vinyl and stick it to the top of the board.
- Add spray paint over the entire board. Let dry. Peel off your vinyl creating a backward stencil.
- Add a layer of spray polyurethane and let dry.
- Drill holes to attach your knobs where you want them.
- Add your tools and hang your sign.
Holiday Shopping at Owenhouse ACE Hardware
We’re your one-stop-shop for holiday shopping this season! From the highest quality kitchen cutlery to Le Creuset cookware, power tools to grills, you’re sure to find something for everyone on your list. What about an oven that cooks pizza in 60 seconds? Check out the new line of Ooni pizza ovens we carry. For that outdoor enthusiast that loves to stay warm, how about a Solo Stove?
Don’t forget about holiday decorations! We have everything you need to decorate your home inside and out! Holiday string lights, LED string lights, lawn decorations, extension cords and timers, wreaths & garland, artificial trees, decorations & tree skirts, ribbon, bows, wrapping paper and SO much more!
Questions? Ask One Of Our Experts Today!
Whether this is your first time hanging lights on your home or using a Dremel etching tool, our experts can talk you through the process and help you find the supplies you’ll need! Give us a call at either location, or just swing by and ask for help! We are here for you!
If you are looking for Christmas DIY supplies near you, look no further! At Owenhouse Ace Hardware we have everything you need to create a memorable and fun holiday celebration at home this year. Our team is ready to help you with any questions you have about what you need for these creative and crafty DIY Christmas projects. We are your one-stop-shop this holiday season, so come visit us at either our Owenhouse West or Downtown location!
